 |
 |
 |
Educational Resources > Research Articles > The Philatelic Foundation ArchivesReperforationBy the Expert Committee Reperforation of stamps is an easy way to "improve" a stamp's appearance or to try to change it into something better than it was originally. Every philatelist should have the ability to detect possible reperforated stamps as a part of his personal philatelic repertoire. Expert committees are fine for the expensive stamps, but what does one do when a certificate costs more than the stamp to be examined? There are certain things a collector can do to protect himself and this article will address them. In order to help, though, it is important to point out why stamps are reperforated. By following some simple procedures the reader will learn more about his stamps and protect himself from most reperforations. There are only four reasons for reperforating a stamp. They are:
Importance of Catalog InformationThe first three cases are attempts to improve a stamp's appearance and condition while the last, the most dangerous, is an attempt to create an entirely new stamp. What can you do to protect yourself from reperforated stamps? Use the knowledge and "tools" available to you. What are these tools? Start with your Scott Standard Postage Stamp Catalogue. Most of us never look, but it is filled with much useful information that remains relatively unchanged, so you do not even have to own the most recent edition. For purposes of illustration, this article will concentrate on the stamps of the United States since the greatest number of collectors in the United States today collect them. In any case, the advice given here will be generally applicable to the stamps issued by other countries as well. The first pages of the Scott Specialized Catalogue of United States Stamps are devoted to basic stamp information. The terminology used in the catalog, stamp production steps, and sheet formats are shown and explained in this section. All of this information is helpful. Two general rules apply here. First, most flat plate printings contain straight edges, and second, most stamps printed on a rotary press do not. There are minor exceptions to both rules, but they can usually be relied upon. Reason for Straight EdgesWe define a straight edge as a side on a stamp with no perforation teeth along it. How does it occur? That requires a bit more explanation. Flat plate printings were usually made from printing plates of 200 or 400 subjects. After printing, these full sheets were cut down into panes of a smaller size to ease their handling by postal employees. Sheets of 200 were separated into two panes of 100 each, while sheets of 400 were cut into four panes of 100 each. Sheets were separated by slicing between the panes. This step left these panes without perforations on one or two sides, depending on the sheet configuration. The side without perforations is called a straight edge. Generally speaking, most early commemorative issues had the straight edge on one side only, while most regular flat plate issues had straight edges on two sides. This translates into 10 of every 100 commemorative stamps and 19 of every 100 general issue stamps with straight edges. One of the latter was straight-edged on two sides. Although straight edges are rarer, collectors prefer their stamps with perforations all around. For this reason, and because of the activities of reperforators since stamps were issued, straight edges are more likely day by day to be referred to in the past tense! There are two ways a collector can determine where the straight edge was on a particular issue. The first goes back to the Scott specialized catalogue. Under the listing for a specific stamp or issue, we can find many hints. "Arrows" were guidelines engraved into the actual printing plate to help the printer align the paper for separating the panes and perforating them. These arrows point towards the straight-edge sides on commemorative issues or to the alignment points for perforation. The Scott catalogue listing of a "margin block of 4, arrow, R or L" indicates that blocks exist that straddle the arrow. This further means that perforations, not a straight edge, went horizontally through the sheet at the arrows. It finally implies that the issue was printed as a plate divided vertically into two separate panes, each having a vertical row of ten stamps without perforations on one side. The statement at the beginning of the listing for the issue may be even more helpful. It may say, for instance, "Plates of 100 (10x10) subjects, divided vertically into 2 panes of 50." An example of this is the "Trans-Mississippi" issue, Scott Nos. 285-293. Where arrow blocks are shown but a side reference is omitted, one can assume that the original sheet format was divided horizontally, resulting in straight edges at top or bottom, such as in the Jamestown Exposition issue of 1907, Scott's Nos. 328-330. This may seem very complex, and there is a simpler way to remember these formats. Every collector has access to auction catalogs. Most of them photograph their better items, and occasionally these include sheets of stamps. Make note where the straight edges occur on the various issues, and keep this information in your personal reference file. If you don't have a file, it's a good idea to make one. It does not change, and is as important as your want list.
Figure 1 illustrates a 1-cent "Trans-Mississippi" stamp showing the clear remainder of a vertical guide line at left. This is shown for two reasons. First, as mentioned earlier, the Scott catalogue shows that this issue comes with side arrows and horizontal guide lines. Thus, any vertical line is the printer's guide for separating two panes that did not have vertical perforations. Therefore, this stamp must be reperforated at left. The second reason to show this stamp is to make the point that even inexpensive stamps get reperforated. This stamp was donated to the PF's reference collection by a collector who bought it as sound! The elimination of faults and the centering of stamps are quite dissimilar reasons for a stamp to be reperforated, but are very related. Typical faults are "pulled" or short perforations, stained perforations, tiny margin tears, thinning in the margin or along the perforations, creases, or even the removal of a cancellation that might be only on a stamp in its margin. By the removal of these problems, a stamp without faults results, one that will sell for far more than it would with the faults. Likewise, sound but off-center stamps are sometimes reperforated to position the design equidistant from the perforations on all sides. The 2-cent "Black Jack" of 1863 is a prime candidate for this, since it is almost always found off-center. This common stamp is not rare, but because of its oversized impression, it is seldom found well-centered. It is not unusual for a very fine copy of this stamp to sell for many multiples of its catalog value. For a "Black Jack," a well-centered copy is rare. As pointed out in the beginning, the removal of straight edges, elimination of faults, or the centering of a stamp are three different activities that can be grouped together as common reasons for reperforating, since their end product is the same. They all result in a reperforated but "improved" example of the same stamp. Luckily for the collector, though, it is extremely difficult for the reperforator to match genuine perforations exactly. There are several reasons for this, and we will examine each. To simplify matters, we need another "tool" for our use. In this case a cheap used or damaged copy of a stamp from the same issue will do nicely, or perhaps even several. The collector of U.S. stamps should have such a copy for every issue that he collects, and each copy should have a natural straight edge. Why? As it is a used stamp of little value, it can be safely assumed that the perforations on the other sides are original and not enhanced. Any value of an issue will do since they were all perforated in a common manner. A 1-cent Columbian's perforations are the same as those on the $5 value. A good perforation gauge such as the United States Specialist Gauge also helps. Before beginning, we should make a quick study of how stamps are perforated. All perforated stamps of the United States more than a few years old were perforated by line perforators, as distinct from comb perforators. Line and Comb PerforationLine perforations require two separate applications of the perforating machine, one for the vertical perforations and another for the horizontal. Line perforations are usually created by a series of parallel perforating wheels, mounted on a rod, which are rolled across a sheet of stamps. The sheet is then turned 90 degrees, and the same or another set of perforating wheels, adjusted to the spacing between the stamps in the second orientation, is applied, resulting in a fully perforated sheet. While this is an over-simplification, the general idea is correct. Comb perforation heads are so named since a single strike of the comb head in a piece of paper looks like a pocket comb. It can be applied either horizontally or vertically. The top of the com b makes the top row (or one full side when applied vertically) of perforations on the stamps. The "teeth" of the comb appear widely spaced and perforate the sides (or the top and bottom when applied vertically) of the stamps. With comb perforations, all perforation holes are uniformly spaced around three sides of a stamp and every stamp in a sheet will have the perforation holes in almost the same location on all sides, and exactly so for those in the direction of subsequent strikes of the comb head. One usual characteristic that identifies almost all comb heads is that all corner perforations will usually meet in a single hole. Comb perforations are found on a great number of foreign issues. Size of Perforation HoleWe may finish this discussion with a few additional points. When paper is pierced by a hard object such as a perforating pin, a hole results in the paper. The size of the hole is determined by two main factors: the diameter of the piercing object and the speed at which the paper is penetrated. These are physical rules that apply to stamp production. Using them, we can make three safe assumptions about a stamp with line perforations. First, the size of the holes on the top and bottom or the left and right should be about the same, since they were punched through the paper at the same time and speed by the same size perforating pins. Second, the opposite side perforations should have the same sharpness or roughness since they were created at the same speed. Fast punched perforations tend to be sharper and cleaner, while those applied at a slower speed tend to have a rougher appearance, with paper fibers extending into the holes and beyond the perforation teeth. And third, the rows of perforations on opposite sides should be parallel to one another. This makes sense since the perforating wheels are mounted side by side on a straight rod or axle and are applied in the same motion. This does not mean to imply that the perforations must be exactly square to the stamp design. Perforations can and often are applied at a slight angle to the actual design. But one thing is sure: If the perfs at the top of a stamp slope slightly downward from left to right, the bottom should do the same and at the same angle. The same rules apply to the side perforations. They can slant, but they had better do the same and to the same degree on both sides.
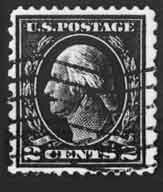
Now let's examine a few stamps using the points just covered. Figure 2 shows an unused 6-cent stamp of the 1869 issue, Scott No. 115, at left. It is a rather typical copy of the stamp showing some short perforations at bottom and left, with the top and right side scissors-separated. While it has a strange appearance, there is nothing to make one unusually suspicious. However, when placed against the copy of the same stamp at right, several things become apparent. The right side holes in the left stamp are smaller, sharper, and gauge slightly differently than those in the reference copy on the right. A quick look shows that the left side perforations on our questionable stamp compare favorably with those on the left of the comparison stamp. On both Fig. 2 stamps the left side perforations appear to have larger holes. Incidentally, the top perforations of our questionable stamp match those on the right side. The left stamp is reperforated at both top and right. The issue comes with straight edges on only the sides, but in this example the design is centered. While there is nothing to show that the right side was originally straight-edged, the holes are too incorrect to be genuine. These perforations were added in one motion by a straight-line perforator, as were the new perforations on the left side of the stamp in Figure 1.
The 2-cent stamp shown on the right in Figure 3 appears to be all right, at first glance. However, when compared with the control copy on the left, it becomes apparent that the left side perforations are too rough to be original. While the top perforations are rougher than those at the bottom, they are basically the same and gauge similarly. The left perforations are a different matter. When compared with the straight-edged control copy's perforations, they are significantly different. The perforation holes are very rough compared to the right sides of either Figure 3 itself or the control stamp. In this case, the suspect perforations have been punched out one at a time on the left side. Single-hole reperforation tends to leave rougher holes with varying spacing. While it is not as apparent here, there are some holes out of line, especially towards the bottom.
Figure 4 shows a different 2-cent Banknote stamp with a different problem that has been almost "cured." This stamp has been reperforated to center it, although the side worked on may not be too apparent. The holes on all sides are fairly uniform in size and sharpness, but the perforations at right show traces of another complete set of perforations along their outer tips. These partial perforations gauge 12, the same as the other sides and the new perforations at the right. Compare the right side with the right side of the perforated stamp in Figure 3. While both have long perf "teeth" on the right side, they differ greatly in appearance when examined closely. The one pictured in Figure 4 was expertly altered and passed by some good examiners. It remains a prime example of when a certificate is needed. Regarding the stamp in Figure 5, we are concerned only with the top perforations. The first three holes at left are uniform but placed much deeper than the rest of the row and are sharper. Why? No doubt there was a pulled perforation on this otherwise desirable stamp, so the perforation holes were deepened to make it appear there were full perforations all around. The PF's Expert Committee refers to a stamp that is reperforated on less than a full side as one with "improved perforations."
Is there anything wrong with the Columbian 4-cent error of color, Scott No. 233a, pictured in Figure 6? Not particularly, except for a natural paper inclusion and an unpunched perforation at the right. It is not uncommon for this issue to have unpunched perforation holes caused by missing perforating pins on the perforating wheel. Collectors tend to shun such copies, so certain people seek them out as a less expensive resource, then attempt to improve their appearance by punching out the missing perforation hole. If well done, this is almost impossible to detect and will usually not be described on a certificate. Figure 7 shows a $5 Columbian stamp with some strange perforations on the top. While one or two can vary in spacing, being closer to, or farther from, the perforation next to it, this has too much variation to be correct. Also, the depth of the holes is wrong. It varies too much to be normal, especially when compared with that at the bottom. This type of reperforation is seldom encountered these days, except on stamps that were crudely reperforated years ago. Reperforating equipment, like most technological devices, has improved over the years. Unless there is no room left in the margins of the stamps, many of them have been re-reperforated, especially those of a sufficient value to warrant the extra work.
The next type of pure reperforation is shown on the right side of the 5-cent Banknote pictured in Figure 8. A close examination of the right side perforations shows them to be doubly punched. While this might occasionally occur, although rarely in normal stamp production, the lack of evidence of similar doubling on the left side tends to condemn the stamp. This type of reperforation is usually done on a single-pin perforator rather than by more modern and sophisticated equipment. Each hole is punched individually, and the device used creates a partially punched second hole slightly closer to the stamp design than the completely punched hole.
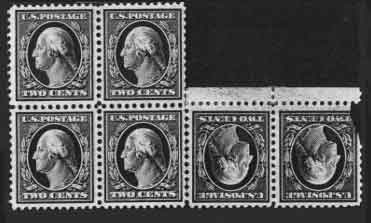
The block pictured in Figure 9 is shown to illustrate another method to determine reperforation. Since this method can be the trickiest and does not work all the time, it is being addressed last. It involves perforations that fall between stamps in pairs, strips, blocks or even larger multiples. When a sheet is perforated by a line perforator, two applications are needed. The perforating devices are passed across the sheet between the stamp designs on it. The sheet is then turned 90 degrees and perforated a second time. The resulting rows of perforations are parallel to one another and usually fall about the same distance away from each stamp design in the same row. So if a vertical row of perforations is located close to the left side of a stamp, it will be farther away from the right side of the same stamp, and the other stamps adjoining this stamp will have more or less the same centering across the horizontal row. This centering usually does not vary much across a sheet, especially within blocks or other small multiples. These observations apply to the issues after 1894 more than to those before. To better determine the centering of a stamp, it sometimes helps to use a "mask" such as a black plastic stock card. Placed along a row of perforations and over another stamp in a pair or block, a stock card will mask other stamps and allow the viewer to see a stamp's centering without distraction and without separating the item. To a viewer using this technique, the block in Figure 9 looks narrow. The vertical perforations down the center between the stamps are well centered, equidistant from the stamps on either side. The vertical perforations on the block's right side appear closer to the stamps on the right than do the vertical perforations in the center to the stamps on the left, but the vertical perforations on the block's left side are far closer to the stamps on the left than are the center perforations to the stamps on the right. Additionally, some of the perforation holes along the left side appear strange and gauge slightly off, although not enough to illustrate effectively. The block is reperforated at left, along both stamps. While no traces remain, this left side was a normal straight edge on a sheet of 100. Since it was cut close to the stamps, there was not enough room to space the perforations properly, so they were added closer to the stamps than they would normally fall. It may be noticed that much of this discussion is written without referring to or using a perforation gauge. This does not imply that perforation gauges are useless, but rather shows other ways to detect reperforating. Now let us address perforation gauges. They consist of either rows of spaced perforation holes or vertical lines that gradually diverge up the gauge. For U.S. stamps, the best available gauge is the United States Specialist Gauge. This gauge is good because it displays the actual configuration of perforation holes created by the government printers. The dots showing the perf holes are the exact diameters of the genuine perforation holes found on the issues. Of course, actual perforations might vary depending on the speed at which they were punched, but they are generally very close in size to the dots on the specialist gauge. That is the good news. The bad news is that some very sophisticated reperforating equipment is also based on this gauge. In spite of this, it can be used quite effectively with a little common sense. For instance, if the side of a stamp being gauged has holes slightly wider spaced than those pictured on the gauge, the other side should be spaced the same. If the perforations are slightly closer spaced than the gauge, again, the opposite side should be the same. Why is the gauge not the absolute authority and why accept slight uniform differences, side to side or top to bottom? Differences may be due to paper shrinkage. Paper, by its very nature, is not a uniform substance. It is made of a watery mixture of vegetable fibers of some sort to which is added cementing and sizing agents. The whole substance is subjected to pressure and evaporation in the process of drying. Once it has been made, paper can expand or contract by a very small amount depending on the climatic conditions to which it is later subjected. All paper has a characteristic called "weave" or mesh, which is caused by the elongated shape of the fibers, which line up parallel to one another in the paper-making process. Depending on the moisture available, these fibers tend to swell or contract across their short axis. If very humid, the paper tends to expand in the direction across the mesh, while in dry conditions it will contract. This is an over-simplification of a complex subject but sufficient for our purposes. Simply put, the original perforations were created under constant conditions, and though the paper may have changed size due to a change in humidity, the gauge of the original perforations will have changed equally on both sides. If the spacing on one side varies much from the other, you have a right to be suspicious. The last type of perforations we will discuss may or may not be considered reperforation. Since the basic stamp's identity is changed, it is the most fraudulent and therefore the most dangerous type of counterfeit perforations a collector can expect to confront. The intended result is a more valuable stamp, in terms of both the catalog and the market value. Up to now we have concentrated on reperforation or the adding of new perforations on one or more sides. The basic stamp's identity remained the same, and only the market value was affected. A fully perforated or well-centered fault-free specimen will be worth more than its straight-edged, off-center or slightly defective counterpart. But now we face a whole new situation! What can reperforators do?
Let us examine a few cases and explain the "whats" and "whys." Figure 10 shows, on the left, a line pair of a 1-cent flat plate coil. While the stamps are genuine and this pair was issued by the U.S. government, the perforations have been added to an imperforate coil pair. A number of stamps were issued imperforate at the request of bulk mailers, companies that did large mailings back in the 1910s and 20s. These companies used the coils either imperforate as issued or added their own perforations so they could use the coils in their affixing machines. Whatever the reason, the fact remains there has always been more of a market for perforated coils than for imperforate ones. The perforations shown in the left pair in Figure 10 are too small and sharp, unlike those found on genuine coils. A genuinely perforated coil pair is shown on the right for comparison. Note that the genuine holes are larger and rougher than those on the faked pair at left. This is an example of a typical faked coil.
A general rule will serve the reader here. If an early flat plate coil stamp is well-centered and "never hinged," it is probably bad. Or, at best, it needs a certificate. While this statement may sound pessimistic, it is more often right than wrong. The block of four stamps in Figure 11 is listed in the Scott Standard Postage Stamp Catalogue as No. 519, or at least it claims to be Scott No. 519. This stamp, perforated 11, is quite rare, since the basic stamp was issued during the period when the government was using 12-gauge perforations. A number of imperforate, double-line watermarked sheets were found and turned in for destruction by the New York postal authorities a dozen years after they were issued. The government, though, perforated and re-issued these sheets. They used the 11-gauge perforator then in use and the only one available. Since these No. 519s are limited in number, and there was no announcement of their issuance, they are quite scarce and command far greater prices than their imperforate or perf 12 counterparts. The imperforate stamps from which the government made the original 519s are readily available and are still being used to create dangerous imitations. Also in Figure 11 is a defective but genuine pair of Scott No. 519 from the PF's John N. Luff Reference Collection. On the surface, there is little to distinguish between the block and pair. However, the photo points up some slight differences between the perforations. The perforation holes on the block are a trifle larger, are rougher, vary slightly in alignment, and gauge differently, although ever so slightly, from the genuine Scott 519 pair. The block is not genuine. A few other quick pointers on this tricky stamp should be mentioned. Because the sheets sat around for a few years before being returned and perforated, they tend to be a little toned, especially on the gum. This toning can vary, though, depending on where in the stack of sheets a stamp may have been located. In any case, the gum is usually more yellowish than normal for stamps of the period. Second, it would appear that all sheets used to create Scott No. 519 were lower left panes of 100, having straight edges at top and right. The PF's Expert Committee has examined, and found to be fraudulent, some excellent top and right side plate number blocks. This leads to the final point. All Scott No. 519s should have a certificate from a recognized authority. Like Scott No. 519, the 2-cent single-line watermarked issue of 1915, perforated 11, was issued with little fanfare. Listed by Scott as No. 461, it has always been far scarcer than its modest catalog value would suggest. Because of the relative ease with which counterfeits can be made, the hobby abounds with them. The single copy shown in Figure 12 is part of the PF's reference collection. It was donated to get it off the market, as it is not genuine. The plate number block, however, is a genuine example of this scarce issue. While identifying genuine copies of this stamp can be a difficult, there are certain characteristics that help. Most important is color. Scott No. 461 comes in a very distinctive pale red. The imperforate stamp from which most counterfeit examples are made very rarely comes in the same shade. Most copies of Scott No. 409 are in deeper carmine and less red shades. The perforation holes on a genuine Scott No. 461 are sharply punched and often appear very slightly oval-shaped uniformly along any row. Additionally, the opposite side corresponds closely since it was punched at the same time and at the same speed. The reason for this elongation of perforation holes is attributable to perforation pins puncturing the paper and pulling out as the paper is moving. This results in a perforation hole that is pushed down slightly on one side where the pin enters the paper, and raised slightly on the opposite side of the hole as the same pin leaves. This raised effect is caused by the paper moving away from the perforating pin. This raised side is often left a bit ragged since tiny paper fibers remain attached to the higher side of the hole. These fibers left in the same areas of each perf hole along that row result in the optical effect of making the holes appear to be slightly oval shaped, rather than round. Often this rough side is at an angle rather than at the top, bottom or a side of the holes.
Figure 12 shows the difference between the perforations on the single and block of Scott No. 461. On the bad single stamp, the perforation holes are slightly larger and the gauge differs from the genuine block. The poorly centered block shows typical examples of Scott No. 461, while the single is well-centered and has large margins. Copies do not come this way, and when they do, one has to be doubly careful to avoid something made for the individual who demands a condition that does not exist. The pair of 2-cent stamps illustrated in Figure 13 was issued both perforated and imperforate. A very small number of the perforated stamps was also issued as shown, without vertical perforations. In this pair the stamps are real but the perforations at top and bottom are counterfeit. The horizontal perfs have been added to the issued imperforate stamps. The pair is shown to point out that more than 20 pairs, exactly like this one, have been submitted for opinion in the last two years, all of them bad! Genuine examples of this rare error, seldom encountered, are centered differently. A genuine example has not been submitted to the PF's Expert Committee for an opinion in the last six years.
Another problem is pictured in Figure 14. This time the stamp is one of the scarcer varieties, Scott No. 425d, perforated 12 by 10. Like many of the other stamps shown, it is not genuine. The perforations at top and bottom have been added to a horizontal coil stamp, Scott No. 444.
The last type of perforation problem to be addressed is illustrated in Figure 15. The $5 Columbian is not a stamp but a plate proof fraudulently perforated all around. Plate proofs come from imperforate sheets of trial impressions made from new printing plates before the issuance of actual stamps. A close examination of the perforations shows them to be too sharp, too large, and just too regular to be genuine for the American Banknote issues, which tend to have perforation holes more irregular than this. Above this proof is a genuinely perforated stamp of the same issue. The proof from a new plate appears far sharper and clearer. Regularly issued stamps are printed from plates that wear during printing, and stamp impressions reflect this wear by appearing slightly blurrier than proofs. In addition, proofs are usually far cheaper than the corresponding high value stamps regularly issued during this period. Since there is less demand for proofs, the reason for this kind of manipulation becomes obvious.
The last type of perforation problem to be addressed is illustrated in Figure 15. The $5 Columbian is not a stamp but a plate proof fraudulently perforated all around. Plate proofs come from imperforate sheets of trial impressions made from new printing plates before the issuance of actual stamps. A close examination of the perforations shows them to be too sharp, too large, and just too regular to be genuine for the American Banknote issues, which tend to have perforation holes more irregular than this. Above this proof is a genuinely perforated stamp of the same issue. The proof from a new plate appears far sharper and clearer. Regularly issued stamps are printed from plates that wear during printing, and stamp impressions reflect this wear by appearing slightly blurrier than proofs. In addition, proofs are usually far cheaper than the corresponding high value stamps regularly issued during this period. Since there is less demand for proofs, the reason for this kind of manipulation becomes obvious. Every type of perforation problem examined here comes from actual cases presented to the PF's Expert Committee for an opinion. This short survey is not intended to make a perforation expert out of the reader. It is intended to help warn the novice of possible problems he might encounter and suggest aids in both identifying and solving them. Try to remember sheet formats, use comparison copies and a good perforation gauge, and know when to ask for help. Most dealers and auction houses are honest. Mistakes they make are usually not intentional. Reperforation is not as hard to detect as some might think. This discussion should give those who use the techniques mentioned a much better understanding of how to look at stamps for possible problems of reperforation. If any doubts remain after one uses these techniques, an expertizing service will usually be able to resolve them.
|
The Philatelic Foundation is located at 341 West 38th Street, 5th Floor, New York, NY 10018 Copyright 2005 - by The Philatelic Foundation, all rights reserved.
|
| Home | What's New | Expertizing | Why Expertize? | History | Educational Resources Publications | Who's Who | Become a Contributor | Contact The PF Application for a Certificate |